User Provisioning
Manage users and your Orb fleet, and set up World ID verification
Orb Management
Orb Management
How to Power Your Orb (Battery or Adapter)
Diamond Orbs can be powered in two ways: with a battery or with a power adapter. Your Orb includes everything you need to get started, and below you’ll find clear steps for using each one.
Using the Battery
Here’s what the Diamond Orb battery looks like. Here’s everything you need to know to get it ready and insert it safely.
Before You Start
For best results, charge the battery for at least 4 hours before your first use.
A standard 65W laptop charger (like a MacBook charger) works well for charging.
How to Insert the Battery
Align the flat edge of the battery with the rear compartment.
Slide it in gently until you hear a click.
Confirm the battery is firmly seated.
Using the Power Adapter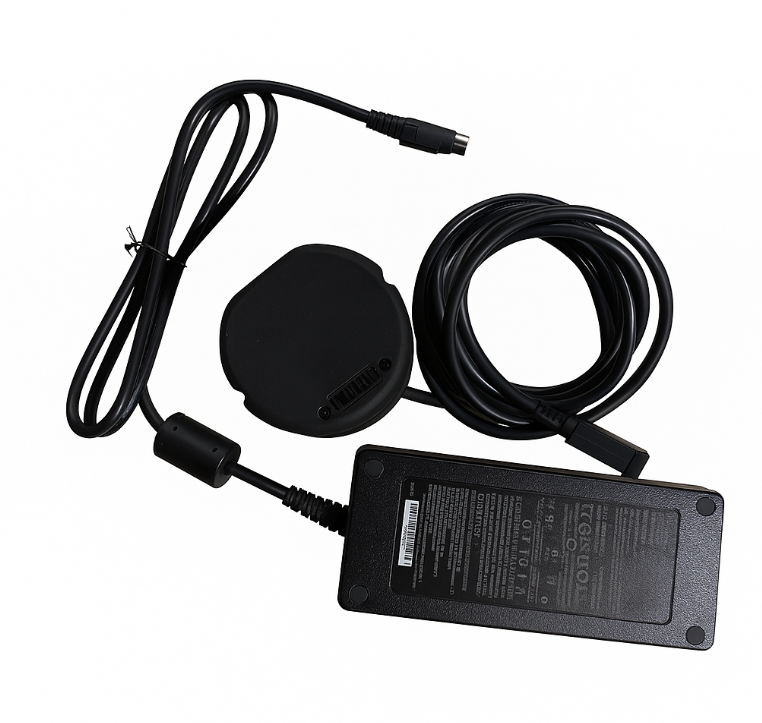
Some Diamond Orbs come with a power adapter instead of a battery.
To use it:
Connect the adapter to the Orb.
Plug it into a wall outlet.
The Orb will operate exactly the same way as it does with a battery.
Check Your Battery Level
Each Diamond Orb battery includes four LEDs (Power indicators), and each one represents approximately 25% of the battery’s charge.
| LED Display | Charge Level |
|---|---|
| ⚪⚫⚫⚫ (Flashing × 8) | 0 % |
| ⚪⚫⚫⚫ | 1 – 25 % |
| ⚪⚪⚫⚫ | 25 – 50 % |
| ⚪⚪⚪⚫ | 50 – 75 % |
| ⚪⚪⚪⚪ | 75 – 100 % |
To check the charge level while the battery is unplugged, press the small button on the back of the battery.
Note:If the first LED blinks 8 times, the battery is fully depleted and must be recharged. When an empty battery is inserted into the Orb, the Power button will flash red three times and the Orb will automatically shut down.
Turning the Orb On and Off
Power On
Insert the battery or connect the power adapter.
Press the Power button at the bottom of the Orb for 3 seconds.
The button will pulse white, indicating the Orb is starting up.
Power Off
Press the Power button for 3 seconds.
The button light will turn off.
If the internal ring light remains yellow, wait until it turns off, and the Orb cools down before removing the battery.
Quick Fixes (If Something Isn’t Working)
The Orb won’t turn on
Using a power adapter:
Make sure it’s firmly plugged in on both ends.
Using battery:
Check that the battery is charged.
Ensure it clicked fully into place.
If the metal connector blades look damaged, contact Support.
The Orb shuts down repeatedly
If using the power adapter, check for damage to the cord.
If using the battery, recharge it—a low battery is the most common cause.
Translations may differ slightly from the original English content. For the most accurate information, please refer to the article's English version if any discrepancies occur.
Orb Management
Understanding Your Orb’s Lights and Audio Indicators
Your Orb uses simple lights, movements, and sounds to show what’s happening during setup and verification. This guide breaks everything down so you always know what each signal means.
Power Button
You’ll find the Power button on the lower back of your Orb.
When the Orb turns on, the button pulses white and then becomes solid white.
If there isn’t enough power, it will blink red three times.
If the Power button blinks red three times, the battery is empty or the power source isn’t strong enough.
Front Indicators
Internal and External Light Rings
Your Orb has two light rings on the front. They show progress and status during steps like:
Boot up sequence
WiFi setup
Operator QR code scanning
User QR code scanning
Biometric capture
Each color or animation corresponds to a specific stage.
Gimbal (the front mirror)
The golden circular mirror at the center of your Orb is the gimbal.
It usually stays still, but during biometric capture you’ll see it gently move as it tracks the user’s eyes.
Tip:Light ring animations + gimbal movement together give you the clearest indication of what the Orb is doing.
Visual Indicators Guide
Here’s a quick-reference that explains what each indicator means.
Boot up sequence with outer LED ring progressively lighting up
Ready to scan WiFi QR code
Idle – ready to scan Operator QR code
Ready to scan User QR code
Verification (biometric capture)
Audio Indicators
Your Orb also uses short, nonverbal sounds to communicate status. Each tone corresponds to a specific action or alert:
- Bootup
- Start signup
- QR code capture
- Operator QR code load success
- User QR code load success
- Error
- Iris scan success
- Signup success
- Powering down
Quick Fixes
Here are a few things to check if your Orb’s indicators suggest something isn’t working:
The WiFi QR code won’t scan
Make sure the QR code is sharp, centered, and not moving.
Increase or decrease distance slightly.
Verification won’t start
Ensure the Operator QR code was scanned first.
Keep the Orb steady and the user centered.
Biometric capture keeps failing
Ask the user to open their eyes fully.
Reduce bright backlighting behind the user.
Clean the front mirror gently with a microfiber cloth.
Translations may differ slightly from the original English content. For the most accurate information, please refer to the article's English version if any discrepancies occur.
Orb Management
How does my Orb connect to the internet?
Your Orb needs a stable internet connection to complete verifications. This article covers how the Orb stays connected day to day, what to check if it has trouble, and when to contact us.
How your Orb connects
Your Orb can reach the internet three ways:
- WiFi, using a network saved on the device.
- Wired Ethernet, where your site setup includes it.
- Mobile data/LTE, which is built into the Orb and acts as an automatic fallback.
If the WiFi or wired connection drops, the Orb switches to mobile data on its own and stays online. Verifications can continue, but performance depends on mobile signal strength at your site. If that signal is weak, verifications may slow down or fail more often than usual.
This matters when something goes wrong. As long as the Orb is online through any of these, our Support team can check its connection and make changes remotely.
Your network at a glance
Full requirements are in your Enterprise Setup Guide. In summary, the Orb needs:
- WiFi 5 or WiFi 6, on the 5 GHz band. Use 2.4 GHz only where structural limitations mean you need the extra range.
- Download: 25 Mbps. Upload: 10 Mbps. PCP upload: 5 Mbps.
- Latency: max 400 ms.
- A network name and password, with no login screen.
Latency is worth watching more closely than raw speed. A connection with high latency can fail verifications and uploads even when the download figure looks healthy.
⚠️ Important: The Orb can only connect to a password-protected WPA2 network. It does not support captive portal networks that require a browser to accept terms, enter a code, or sign in, such as guest, hotel, or café Wi-Fi. Open networks without a password are also not supported.
Checking your Orb's connection
Your Enterprise Portal shows which network each Orb is currently using, along with its status. This is the quickest way to tell whether an Orb has fallen back to mobile data, which usually means something has changed on the local network.
If an Orb shows Needs attention, open it to see the reason.
If your Orb is having trouble connecting
1. Check the Portal
See which network the Orb is on and what its status is. An Orb running on mobile data when it should be on WiFi points at the local network rather than the device.
2. Confirm the network is available
Check that other devices at the site can reach the internet through it.
3. Confirm the network details have not changed
A rotated password, a renamed network, or a new access point will disconnect the Orb.
4. Confirm the network has no login screen
Guest and visitor networks often add one. These will not work even when everything else on the network connects fine.
5. For intermittent drops, check how your access points hand off
Where 2.4 GHz and 5 GHz are published under one network name, the Orb can be moved between bands mid session, which it does not handle well. Giving the Orb a network name fixed to 5 GHz, or excluding it from band steering, resolves this.
6. Check coverage where the Orb is installed
A weak signal can fail the speed and latency targets above even when the connection itself is fast. Improve coverage at the Orb's location rather than moving the Orb. Its position was chosen for the lighting conditions that verification depends on, so moving it can trade a connection problem for a verification problem.
7. Restart the Orb
If it stays disconnected after the checks above.
Changing the network your Orb uses
Contact our Support team when an Orb needs to move to a different network, for example after a network change at your site or when a password is rotated. Support will confirm the details needed and arrange the change with you.
Still Need Help?
If your Orb still cannot connect after these checks:
👉 Reach out to our Support team from the Support section of your Enterprise Portal.
They can run diagnostics on the Orb, including a speed test from the device itself and a check of the networks it can see, and tell you whether the cause is the network, the device, or something else.
If the Orb has lost every connection, including mobile data, it cannot be reached remotely. Support will arrange the follow-up needed to bring it back online.
Translations may differ slightly from the original English content. For the most accurate information, please refer to the article's English version if any discrepancies occur.
World ID Verification
World ID Verification
How do I sign up for World ID?
To sign up for World ID using World ID App, follow these steps:
- Download the World ID App from the App Store or Google Play Store on your device.
Open the app and tap I am a new user on the welcome screen.
Review the Terms and Conditions and TFH Privacy Notice, then tap Accept to continue.
The app will display a Getting ready screen while your account is being set up — this may take a few seconds.
If your device supports passkeys, you'll be prompted to save a passkey for secure, passwordless sign-in across your devices. Tap Continue to save, or Save on Another Device to store it elsewhere..
Once your account is created, you'll see a Account created (Welcome to World ID) confirmation screen.
- From here you can complete any code redemption steps and continue to get World ID verification. You can verify in person at an Orb, or by adding a Credential (such as a passport).
Translations may differ slightly from the original English content. For the most accurate information, please refer to the article's English version if any discrepancies occur.
World ID Verification
What are World ID Credentials and how do I use them in World ID App?
Introduction to World ID Credentials
World ID Credentials let you securely verify and store information from your NFC chip-enabled government ID on your phone. This information is kept exclusively on your device as part of your Personal Custody Package. It is never shared with Tools for Humanity, World Foundation, or any third party.
World ID App allows you to add, view, and manage your identity Credentials directly from the Credentials tab.
Once added, your Credentials can be used through the World ID protocol and its zero-knowledge proof technology to selectively prove things about yourself, such as confirming you are over 18, without revealing your identity or any other personal information.
Credential Types
Human Credential
The Human Credential is obtained when you get verified with the Orb.
Official ID
The following NFC-enabled government ID types are currently supported (where available):
- Passports
- National ID Cards, such as:
- eID (Italy)
- My Number Card (Japan)
NFC (Near Field Communication) is a wireless technology that allows your phone to securely read information from a compatible document held in close proximity. Most modern smartphones support NFC. On Android, NFC must be enabled in your device settings. On iPhone, NFC is always on.
To be eligible, a passport must display the biometric chip symbol (the small rectangular icon with a circle) on its cover:
How to Add a Credential
- Open the Credentials tab in World ID App.
- Tap the Add verification button.
- Select your government ID type (e.g., Passport or National ID).
- Follow the on-screen instructions to scan your document's NFC chip.
- Once verified, your Credential will appear in the Credentials tab.
Expired Credentials
If a Credential's underlying ID has expired, it will be flagged in the Credentials tab. You will need to re-verify using a valid, unexpired document to restore or update the Credential.
Troubleshooting
I'm having trouble scanning my ID
Visit this article for help resolving common scanning issues: I'm having issues verifying my passport or national ID.
I'm seeing an error when scanning
Common errors include:
- ID Card Expired — The document cannot be used. Try a different, valid ID.
- Country Not Supported — The country of issue is not yet supported. Try a different eligible document.
- No Photo Loaded — The chip on this document did not return photo data. Try a different eligible document.
Frequently Asked Questions
How can I check if my device supports NFC?
Check your device's technical documentation:
- To enable NFC on Android, go to Settings and search for NFC.
- On iPhone, NFC is always enabled.
What ID types can I use?
Currently, NFC-enabled passports and national ID cards are supported. Additional document types may be added in the future.
Where is my data stored?
All information collected during credential verification stays on your device within your Personal Custody Package. Tools for Humanity, World Foundation, and any other third parties have no access to this data.
Who can see my Credential data?
Only you. Your Credential data is stored locally on your device and is never transmitted to or retained by any external party.
Translations may differ slightly from the original English content. For the most accurate information, please refer to the article's English version if any discrepancies occur.
World ID Verification
What should I expect when getting my World ID verified at an Orb?
Getting verified by an Orb is a fast and easy process that will only take a couple of minutes. Before getting verified, it's best to be prepared on what to expect in order to have a seamless and secure signup experience. You’ll find common questions and answers about this process below.
Alternatively, you can follow the recommendations in this blog post: Tips and best practices for verifying your World ID at an Orb.
-
What should I prepare or be aware of before going to an Orb location?
- Make sure to bring your phone and that it is sufficiently charged to complete the signup process.
- Your device needs a strong and reliable network connection.
- Do not wear colored or hard contact lenses (soft lenses are ok). If you're wearing glasses, you'll need to briefly remove them during the verification process.
- Wear no or minimal makeup. Some makeup may reflect light and make it difficult for the Orb to image process.
- Review our help center article on how to keep your World ID App safe.
-
Where do I find my QR code to show to the Orb?
When verifying your World ID with an Orb, you'll need to have your QR code ready to scan.
Follow these steps to find the QR code once you're at the Orb location and ready to proceed with the verification:
1. Open the Credentials tab in the World ID App, then tap Get Verified.
2. Follow the instructions to proceed until you reach this screen:
Make sure you review all of the information carefully before moving forward. Then select Agree and Continue when you're ready.
3. You will see a video explaining the verification process
4. After watching the video, the QR code will be generated on your device
Show your QR code to the Orb to begin the verification process. If you wish to exit, just tap on the X at the top of the screen.
-
Why isn't my QR code scanning?
If you're having trouble scanning your QR code, please take note of the following best practices:
- Increase the brightness on your device's screen. Most of the time, QR codes won't scan if the screen brightness isn't high enough.
- Position the QR code so that it is not in direct sunlight. You want to make sure that there are no reflections on any screens that will prevent the QR code from being read.
- Do not zoom in on your QR code. The entire QR code should be visible, including a bit of the white around the edges.
-
What are best practices when showing my face to the Orb?
The Orb will begin image processing your irises to verify that you are indeed a unique human being. This should only take a minute, and you'll be able to see the progress light up around the Orb's screen. In order to make sure the process goes smoothly:
- Remove any type of masks or eyewear.
- Some headwear may cast shadows on your face. Please remove it if possible.
- Open your eyes as wide as you can and avoid blinking. Try tucking in your chin and looking up at the Orb. This will naturally open up your eyes a bit more and make your irises more visible for the Orb.
- Make sure not to look away from the Orb's screen. Looking away during image processing will reset the Orb's tracking.
- Keep your head and body still during the verification.
During this process, remember to look at the Orb, not the progress animation on your phone. It's also important not to close your app immediately after the verification.
-
The app shows that the verification failed. What can I do?
- Force-close the app, reopen it, and try again.
- Make sure you're using the latest version of World ID App.
- Refer to this article with more details about failed verifications: Why did my World ID verification fail?
- If the above steps don't resolve the issue, please contact our Support team.
Translations may differ slightly from the original English content. For the most accurate information, please refer to the article's English version if any discrepancies occur.
World ID Verification
Why did my World ID verification fail?
When trying to verify with World ID at an Orb, you may sometimes see this message in your World ID App:
“World ID verification was not successful.”
This can feel confusing or frustrating, so here’s what you need to know — and what you can do about it.
Note: For questions about age verification, please follow the link to this article instead How do I confirm my date of birth?
Why does verification fail?
There are two main reasons why verification may not succeed:
-
You may have already verified before
World ID ensures each person can only sign up once. If the system detects that you have already created a World ID (even with a different phone, account, or email), it won’t allow another verification. -
The system made a rare error
In very rare cases, the system may mistakenly reject someone who has never signed up before. To learn more, please visit this blog post: https://world.org/blog/engineering/biometric-performance-billion-person-scale
Troubleshooting
If you see “World ID verification was not successful,” try the following:
-
Retry verification
- Wait a moment and try again.
- Most users who face this error succeed after 1–2 retries.
-
Check your scan quality
- Open your eyes as wide as possible during the scan.
- Avoid blinking right as the Orb captures your iris.
- If you’re at an Orb with staff present, they may remind you to adjust your eye position.
-
Think about past verifications
- Did you get World ID verification at an Orb before? (even with another account or phone)?
- If yes, you won’t be able to get verified again by an Orb.
-
If retries don’t work
- You may have hit a rare false rejection. This doesn’t mean you’re permanently blocked. In many cases, another attempt on a different day may succeed.
- Keep an eye out in the app or our official channels: If repeated retries fail, you may see an option to contact Support for further help.
Important things to know
-
Your biometric data stays private.
World ID uses privacy-preserving technology. Your iris code cannot be traced back to you personally. -
We cannot disclose individual verification status.
For legal and privacy reasons, we cannot confirm whether your rejection was due to a duplicate or an error. The only information available is what you see in-app. -
System accuracy is high, but not perfect.
Our team is continuously improving the system to reduce this even further.
In short: Most verification failures mean you’ve already been World ID verified at an Orb. In rare cases, it could be a one-off error. Retrying once or twice usually helps.
Translations may differ slightly from the original English content. For the most accurate information, please refer to the article's English version if any discrepancies occur.
World ID Verification
Why verifications are failing at your Orb
If your Orb is reporting failed verifications, or shows as Degraded in Your Orbs, the cause is usually the space around it rather than the device. This guide covers what to check, in the order worth checking it.
Power and network
- Confirm the Orb is powered on and its stand is stable.
- Confirm the Orb shows as online in Your Orbs, and that the network column shows a connection rather than Disconnected.
- If it is offline, check the network at your end before anything else. See Orb network requirements.
- If the Orb is powered off or unresponsive, see How to Power Your Orb.
Environment
Lighting
- Use soft, even, office-like lighting. Avoid anything that creates glare or deep shadows.
- Prefer warm-white lighting around 3500K.
- Avoid bright incandescent bulbs. They can interfere with the infrared sensors.
- If the space is dim, add soft, diffused fill light toward the employee's face.
- Avoid reflections or shiny highlights in the eyes.
- For a new location, check light levels with a light-meter app to make sure both eyes are evenly illuminated.
- Keep the Orb away from mirrors, reflective surfaces, LED walls and strong directional lighting, and avoid places where the light changes rapidly.
Orb placement
- Keep the Orb 3 or more meters away from windows, glass doors or skylights, to prevent direct sunlight or backlight.
- Align the stand along a wall to keep the background clean and free of distraction.
- Maintain a tidy area around the Orb to avoid occlusions.
- Position the Orb against a neutral background on a stable stand, slightly below the employee's eye level.
Examples
👍🏼 Good positioning: Orbs placed indoors, away from windows, with consistent lighting.
👎🏼 Poor positioning: outdoors, in front of direct sunlight or bright windows, under skylights, or in poorly lit areas.
Best Practices During Verifications
If the space is right and verifications are still failing, the cause is usually how the employee is standing. These are worth sharing with anyone about to verify.
Distance and framing
- Stand 20 to 40 cm from the Orb.
- Too close or too far can cause an out-of-focus capture.
Height and alignment
- Center your face and look into the mirror inside the lens.
- Adjust your posture rather than tilting or touching the Orb.
Head, gaze and stillness
- Keep your head straight, look directly at the Orb, and avoid blinking during the 3 to 5 second capture.
- Do not touch or move the Orb.
Obstructions
- Remove sunglasses, reflective eyewear, hats, masks and anything covering the eyes, including hair. Colored contact lenses and heavy reflective makeup such as glitter around the eyes can also prevent a capture.
Lighting
- Make sure light on the face is even and diffuse.
- Avoid backlight or bright patterns behind you.
Typical capture time
- With the right positioning and lighting, a capture completes in about 5 seconds.
Troubleshooting (Step-by-Step)
Follow these in order. Move to the next one only if the issue persists.
1. Quick triage
- Confirm the Orb is online in Your Orbs, and check its status and last seen time.
- Check the ring lights and any on-screen message to identify which stage is failing: QR, positioning, capture or network. See Understanding Your Orb's Lights and Audio Indicators.
- Check the verification history on the Orb's detail panel to see whether failures are recent or ongoing.
2. Environment checks
- Lighting: even, no glare, no backlight.
- Placement: clean, neutral background facing the employee.
- Network: stable and meeting the requirements in Orb network requirements. If you are running the Orb on a temporary hotspot, keep the hotspot within 1 to 1.5 meters of it.
3. Employee positioning
- Center the face and make sure both eyes are visible.
- Look at the Orb and remain still.
- Remove sunglasses, eyewear or hair blocking the eyes.
4. QR and pairing issues
- Confirm the employee is on the verification screen in the World ID App.
- Clean the Orb face and the phone screen, and increase phone brightness.
- If the phone still cannot connect, try a guest network if one is available.
5. Capture quality and outside view errors
- Fix harsh shadows or bright sources behind the employee.
- Follow the pre-flight prompts in the app.
6. Repeated failures for one person
- If one employee fails repeatedly while others succeed, the cause is specific to them rather than to the Orb. Ask them to stop retrying and use the support option on the failure screen in their app. Repeated attempts will not change the outcome.
- Two outcomes work this way. If the check cannot confirm a live person, retrying will not help. If the person has already verified before, the app will stop the session and direct them to in-app support.
- See also Why did my World ID verification fail?, which explains this from the employee's side.
7. Reset and re-test
- Power cycle the Orb.
- Wait for a stable network connection.
- Try again once the environment checks above are complete.
- Ask someone who has verified successfully before to try, so you can tell an environment problem from an individual one.
8. Before you contact us
If several employees fail in a row after those checks, these three things let us diagnose it without a site visit.
- Note the exact ring light pattern and the stage at which it stops.
- From about 2 meters away, record a short video showing the full sequence, lights and audio together.
- Have the Orb ID, and the time and location, to hand.
If your Orb uses a battery, a capacitor check is also useful:
- Start the Orb and let it run for 3 minutes.
- Once it is fully on, remove the battery.
- Time how long the Orb takes to shut off.
If it shuts off immediately, the capacitors are not holding charge. Include that result when you contact us.
9. When to contact us immediately
- Systematic timeouts across multiple employees.
- Light patterns suggesting a hardware issue.
- Repeated pairing failures despite the correct app screen and clean optics.
Quick troubleshooting
The employee's QR code will not scan, or pairing fails
- Confirm they are on the verification screen in the World ID App.
- Clean the Orb surface and the phone camera.
- Recheck the network and retry.
Poor capture quality
- Reposition the employee.
- Adjust the lighting.
- Remove eyewear or anything blocking the eyes.
- Retry the capture.
Verifications stop working partway through the day
- Check whether the Orb has gone offline or entered an update. See Monitoring your Orb fleet.
Repeated failures for the same person
- Stop retrying.
- Direct them to the in-app support chat from the failure screen.
Translations may differ slightly from the original English content. For the most accurate information, please refer to the article's English version if any discrepancies occur.
World ID Verification
Why do I need to update my World ID?
Updating your World ID keeps it secure, private, and compatible with new features in World ID App. A quick reauthentication at an Orb ensures that only you can access your World ID through face authentication (Face Auth).
If you verified your World ID before the introduction of the Personal Custody Package (PCP) in March 2024, or if your Orb images don’t meet the quality requirements for Face Auth, you may be prompted in the app to reauthenticate at an Orb.
This update also:
- Enhances security and anti-fraud measures.
- Improves image quality to be compatible with Face Auth.
- Unlocks new features like World for Zoom.
- Ensures compatibility with upcoming World ID protocol upgrades.
In short, it protects your unique proof of human while unlocking the latest functionality in World ID App.
How does the update work?
You may see a message in World ID App, on the Home or Face Auth screen, prompting you to update your World ID. To reauthenticate:
- Find an Orb near you. Orb locations are walk-in — no appointment is needed. Check the location’s opening hours before you visit.
- At the Orb, scan the QR code shown in your app and follow the instructions on your phone.
- The Orb will take new, high-quality images of your eyes and face, which are encrypted and securely stored on your device – and only your device – within your PCP.
- Once complete, a confirmation message will appear.
If the Orb can’t scan your QR code, try increasing your screen brightness and avoiding glare. If you’ve already completed the update but still see the prompt, please wait up to 24 hours for the changes to sync.
Who needs to visit an Orb?
You may be asked to update your World ID if:
- You verified before the introduction of the Personal Custody Package (PCP) in March 2024, or
- The images captured during your original Orb verification aren’t of high enough quality for Face Auth.
If you don’t complete the update within 30 days of being notified, some features, such as using World for Zoom, may be temporarily unavailable. You can restore full access anytime by completing the update.
Is my privacy protected?
Yes. Updating your World ID is fully privacy-preserving. Neither World Foundation, Tools for Humanity (TFH), nor any third party has access to your World ID or PCP.
When you open World ID App, it simply checks locally whether your World ID is up to date.
If it’s not, you’ll see a message prompting you to visit an Orb. All of this happens on your device and your data never leaves it.
Translations may differ slightly from the original English content. For the most accurate information, please refer to the article's English version if any discrepancies occur.