Orb Management
Orb Management
How to Power Your Orb (Battery or Adapter)
Diamond Orbs can be powered in two ways: with a battery or with a power adapter. Your Orb includes everything you need to get started, and below you’ll find clear steps for using each one.
Using the Battery
Here’s what the Diamond Orb battery looks like. Here’s everything you need to know to get it ready and insert it safely.
Before You Start
For best results, charge the battery for at least 4 hours before your first use.
A standard 65W laptop charger (like a MacBook charger) works well for charging.
How to Insert the Battery
Align the flat edge of the battery with the rear compartment.
Slide it in gently until you hear a click.
Confirm the battery is firmly seated.
Using the Power Adapter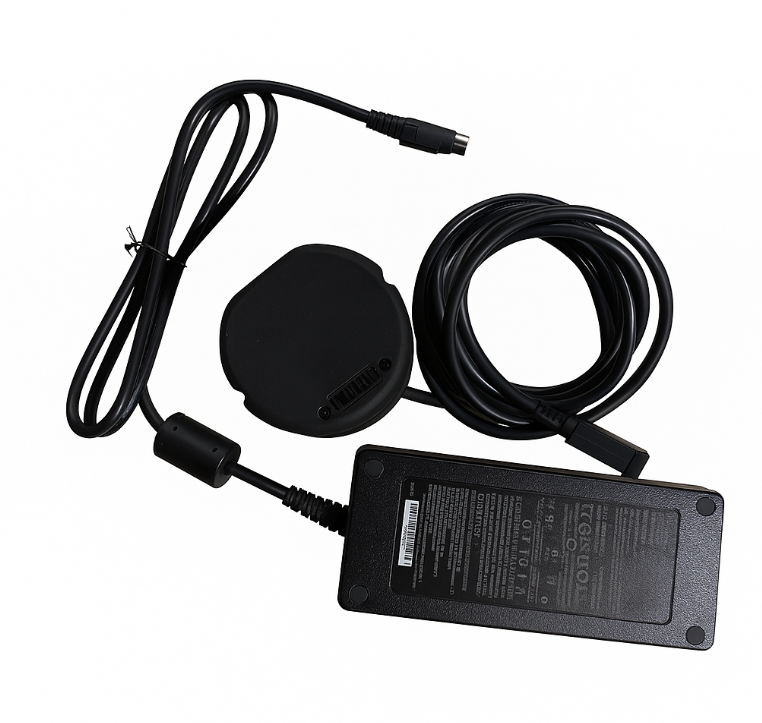
Some Diamond Orbs come with a power adapter instead of a battery.
To use it:
Connect the adapter to the Orb.
Plug it into a wall outlet.
The Orb will operate exactly the same way as it does with a battery.
Check Your Battery Level
Each Diamond Orb battery includes four LEDs (Power indicators), and each one represents approximately 25% of the battery’s charge.
| LED Display | Charge Level |
|---|---|
| ⚪⚫⚫⚫ (Flashing × 8) | 0 % |
| ⚪⚫⚫⚫ | 1 – 25 % |
| ⚪⚪⚫⚫ | 25 – 50 % |
| ⚪⚪⚪⚫ | 50 – 75 % |
| ⚪⚪⚪⚪ | 75 – 100 % |
To check the charge level while the battery is unplugged, press the small button on the back of the battery.
Note:If the first LED blinks 8 times, the battery is fully depleted and must be recharged. When an empty battery is inserted into the Orb, the Power button will flash red three times and the Orb will automatically shut down.
Turning the Orb On and Off
Power On
Insert the battery or connect the power adapter.
Press the Power button at the bottom of the Orb for 3 seconds.
The button will pulse white, indicating the Orb is starting up.
Power Off
Press the Power button for 3 seconds.
The button light will turn off.
If the internal ring light remains yellow, wait until it turns off, and the Orb cools down before removing the battery.
Quick Fixes (If Something Isn’t Working)
The Orb won’t turn on
Using a power adapter:
Make sure it’s firmly plugged in on both ends.
Using battery:
Check that the battery is charged.
Ensure it clicked fully into place.
If the metal connector blades look damaged, contact Support.
The Orb shuts down repeatedly
If using the power adapter, check for damage to the cord.
If using the battery, recharge it—a low battery is the most common cause.
Translations may differ slightly from the original English content. For the most accurate information, please refer to the article's English version if any discrepancies occur.
Orb Management
Understanding Your Orb’s Lights and Audio Indicators
Your Orb uses simple lights, movements, and sounds to show what’s happening during setup and verification. This guide breaks everything down so you always know what each signal means.
Power Button
You’ll find the Power button on the lower back of your Orb.
When the Orb turns on, the button pulses white and then becomes solid white.
If there isn’t enough power, it will blink red three times.
If the Power button blinks red three times, the battery is empty or the power source isn’t strong enough.
Front Indicators
Internal and External Light Rings
Your Orb has two light rings on the front. They show progress and status during steps like:
Boot up sequence
WiFi setup
Operator QR code scanning
User QR code scanning
Biometric capture
Each color or animation corresponds to a specific stage.
Gimbal (the front mirror)
The golden circular mirror at the center of your Orb is the gimbal.
It usually stays still, but during biometric capture you’ll see it gently move as it tracks the user’s eyes.
Tip:Light ring animations + gimbal movement together give you the clearest indication of what the Orb is doing.
Visual Indicators Guide
Here’s a quick-reference that explains what each indicator means.
Boot up sequence with outer LED ring progressively lighting up
Ready to scan WiFi QR code
Idle – ready to scan Operator QR code
Ready to scan User QR code
Verification (biometric capture)
Audio Indicators
Your Orb also uses short, nonverbal sounds to communicate status. Each tone corresponds to a specific action or alert:
- Bootup
- Start signup
- QR code capture
- Operator QR code load success
- User QR code load success
- Error
- Iris scan success
- Signup success
- Powering down
Quick Fixes
Here are a few things to check if your Orb’s indicators suggest something isn’t working:
The WiFi QR code won’t scan
Make sure the QR code is sharp, centered, and not moving.
Increase or decrease distance slightly.
Verification won’t start
Ensure the Operator QR code was scanned first.
Keep the Orb steady and the user centered.
Biometric capture keeps failing
Ask the user to open their eyes fully.
Reduce bright backlighting behind the user.
Clean the front mirror gently with a microfiber cloth.
Translations may differ slightly from the original English content. For the most accurate information, please refer to the article's English version if any discrepancies occur.
Orb Management
How does my Orb connect to the internet?
Your Orb needs a stable internet connection to complete verifications. This article covers how the Orb stays connected day to day, what to check if it has trouble, and when to contact us.
How your Orb connects
Your Orb can reach the internet three ways:
- WiFi, using a network saved on the device.
- Wired Ethernet, where your site setup includes it.
- Mobile data/LTE, which is built into the Orb and acts as an automatic fallback.
If the WiFi or wired connection drops, the Orb switches to mobile data on its own and stays online. Verifications can continue, but performance depends on mobile signal strength at your site. If that signal is weak, verifications may slow down or fail more often than usual.
This matters when something goes wrong. As long as the Orb is online through any of these, our Support team can check its connection and make changes remotely.
Your network at a glance
Full requirements are in your Enterprise Setup Guide. In summary, the Orb needs:
- WiFi 5 or WiFi 6, on the 5 GHz band. Use 2.4 GHz only where structural limitations mean you need the extra range.
- Download: 25 Mbps. Upload: 10 Mbps. PCP upload: 5 Mbps.
- Latency: max 400 ms.
- A network name and password, with no login screen.
Latency is worth watching more closely than raw speed. A connection with high latency can fail verifications and uploads even when the download figure looks healthy.
⚠️ Important: The Orb can only connect to a password-protected WPA2 network. It does not support captive portal networks that require a browser to accept terms, enter a code, or sign in, such as guest, hotel, or café Wi-Fi. Open networks without a password are also not supported.
Checking your Orb's connection
Your Enterprise Portal shows which network each Orb is currently using, along with its status. This is the quickest way to tell whether an Orb has fallen back to mobile data, which usually means something has changed on the local network.
If an Orb shows Needs attention, open it to see the reason.
If your Orb is having trouble connecting
1. Check the Portal
See which network the Orb is on and what its status is. An Orb running on mobile data when it should be on WiFi points at the local network rather than the device.
2. Confirm the network is available
Check that other devices at the site can reach the internet through it.
3. Confirm the network details have not changed
A rotated password, a renamed network, or a new access point will disconnect the Orb.
4. Confirm the network has no login screen
Guest and visitor networks often add one. These will not work even when everything else on the network connects fine.
5. For intermittent drops, check how your access points hand off
Where 2.4 GHz and 5 GHz are published under one network name, the Orb can be moved between bands mid session, which it does not handle well. Giving the Orb a network name fixed to 5 GHz, or excluding it from band steering, resolves this.
6. Check coverage where the Orb is installed
A weak signal can fail the speed and latency targets above even when the connection itself is fast. Improve coverage at the Orb's location rather than moving the Orb. Its position was chosen for the lighting conditions that verification depends on, so moving it can trade a connection problem for a verification problem.
7. Restart the Orb
If it stays disconnected after the checks above.
Changing the network your Orb uses
Contact our Support team when an Orb needs to move to a different network, for example after a network change at your site or when a password is rotated. Support will confirm the details needed and arrange the change with you.
Still Need Help?
If your Orb still cannot connect after these checks:
👉 Reach out to our Support team from the Support section of your Enterprise Portal.
They can run diagnostics on the Orb, including a speed test from the device itself and a check of the networks it can see, and tell you whether the cause is the network, the device, or something else.
If the Orb has lost every connection, including mobile data, it cannot be reached remotely. Support will arrange the follow-up needed to bring it back online.
Translations may differ slightly from the original English content. For the most accurate information, please refer to the article's English version if any discrepancies occur.